
This is a vegetable tart made for Pi Day (3/14) - it's based on a recipe from Kevin Isaacson (exec chef at the Caltech Athenaeum) which in turn is basically a standard short crust and custard.
The Vegetables
I used asparagus, cherry tomatoes (cut in half) and ribbons of yellow squash and zucchini. One thing to be aware of when making these tarts is that vegetables that have a lot of water (zucchini and tomatoes, for instance) can exude all that water during baking and affect the texture. So what I did this time was roast the tomatoes in a 375 oven for about 10-15 minutes before using them. Put the tomatoes on the pan, use a liberal amount of oil, a sprinkle of salt, and roast away.


The crust
The crust is where a pie or tart starts. The recipe, by mass, is 3:2:1 of flour, cold butter, and ice water. The flour (2 cups of AP flour unsifted) with 1/2 tsp of salt is mixed with chunks of butter (6 oz), run with the mixer until "size of walnuts" - basically you want chunks still, not to the "coarse cornmeal" stage you might use for scones. Then you add the ice water and mix minimally until the dough "comes together". Once you're at this stage, you add in some interesting flavors: in this case, toasted pine nuts that have been chopped up, and some grated parmesan, about 1/4 cup of each, but it's not super critical. Roll it and fold it and roll it a couple times, wrap it in plastic and put it in the refrigerator to chill. You want the butter to be fairly hard, and the rolling and folding makes the butter into flat pieces in the crust.Flour in the mixing bowl. There's about 1/2 tsp of salt in the 2 cups of flour, and it's something you don't want to omit. sI did this once by mistake and it creates a peculiarly bland pastry that tastes very odd. Fortunately, I caught it when I was tasting the crust trimmings after blind baking the shell, so I salted the crust before filling it. The crust was still a bit weird, but it rescued the tart after all.


I've tried the freeze butter and grate it approach, but the cubes seem to work better, and it's faster anyway. You run it in the mixer until the cubes are fairly broken up. The recipe says "size of walnuts" which doesn't tell you "in the shell, shelled, or chopped". Other recipes say "pea sized". In any case, you want distinct lumps of butter still, not the "coarse cornmeal" texture you might use for scones. Older recipes say "rub in the butter" and that actually works pretty well if you're doing it by hand. You squish the butter morsels between thumb and fingers covering them in flour, so you wind up with little flakes of butter. This works better in a freezing cold kitchen in England than in a warm kitchen in southern California. The whole goal here is "cold butter chunks which will be squashed flat by the rolling" and warm hands in a warm kitchen gets you to the wrong place.

After you've mixed in the ice water, this is what it looks like. The warning is to not over mix - just until it sticks together. Too much water, and you wind up with oily pizza dough and the temptation to over-roll and work it.

I mixed in the toasted pine nuts and grated parmesan cheese. Then I did a few "roll it to about 1/2" thick, fold it over, roll it again" cycles. This is truly one of the things where it took doing it a few times to get the right feel and butter lump size. Your first batch will be ok, and casual observers will be hungry and not picky about the texture, but after a few tries, it comes out much more consistent.
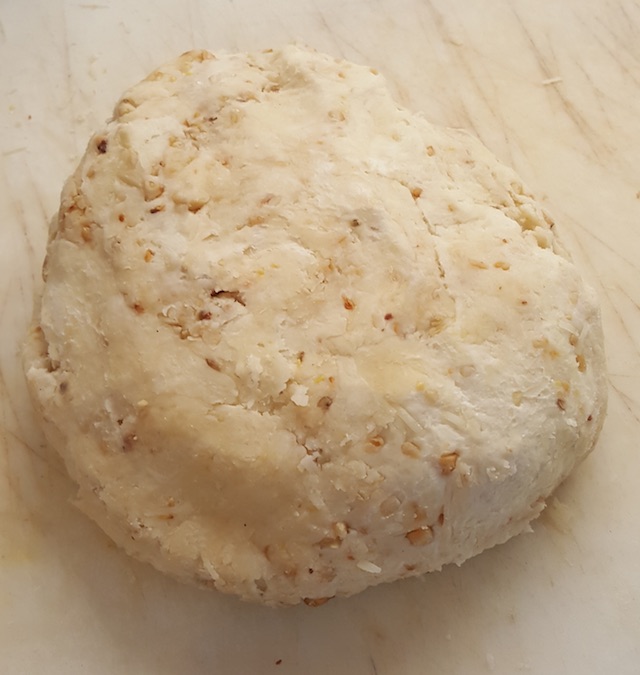
And here's the lump of crust, ready for chilling. Smash it out flat until it's about an inch thick, wrap it in plastic, and put it in the refrigerator. Chilling is essential. By the time it's had the nuts worked in, it's getting pretty warm and soft. Play-doh consistency is too soft. You want it to be like a rock when you roll it out for the crust where you really have to lean into it when rolling.
Preparing the tart shell
The next step is to roll the crust thin, make the shell in the pan and blind bake it. It will then cool before filling and the final bake. I've left out the cooling step, and it sort of works, but the crust gets wetter. I've even baked a tart without doing the blind bake step - that was distinctly a soggy bottom scenario, and it actually leaked (I didn't do a good job sealing the gaps when putting the crust in the pan).I rolled the dough out to 1/8" thickness and made sure it's going to fit. You'll see people using a ruler to measure their pan and then measure the dough. Sure, you can do that, but I just put the pan on the rolled out dough and see if it will fit. In this picture, the dough needs a bit more rolling out. When I've made it in the 4x10" rectangular pan, you wind up with a lot of extra dough. You probably only need half the amount as you do for the 10" round pan here.


In the picture above, I've trimmed it so about 1/2" sticks out past the edge. I have trimmed to the edge before, but I found that the crust shrinks back a bit when baking, and you lose some edge height. The final step is to "dock" it - poke it with a fork and put lots of little holes in the bottom. This lets some of the steam out during baking so the bottom doesn't puff up too much.


So here's a secret - really shove the beans up against the sides - it's the sides that want to collapse. The crust in the bottom is laying flat, it's on a double layer of pan, so it doesn't get as hot. The other thing is to trim the parchment paper fairly close - if you've got a big piece of paper hanging over the edge, the crust doesn't bake as fast. In most ovens, a good fraction of the cooking is done by radiant heat from the oven sides, not conduction from the hot air. The bottom of the crust is cooked entirely by conduction from the pans and through the beans on top.
While it's cooling, that's when you make the custard mix and prep all the vegetables.
Custard Mix
The custard is pretty standard and I've made it using all sorts of variations.- 2 eggs
- 1 cup of heavy cream
- 8 oz of goat cheese (I found out that goat cheese comes in logs of various sizes that all look about the same, I've seen 6, 8, and 10 ounce sizes - frankly, for this recipe, it makes no difference)
- 1/2 cup of grated cheese (Parmesan or Gruyere - I used a mixture, since I didn't have enough Gruyere to make a 1/2 cup)
- a few tablespoons of Basil as a chiffonade - I grab a bunch of leaves, stack them up, roll it, and slice thin. Don't do this part ahead of time - Basil turns gross and black almost instantly when you cut it.
- Salt and Pepper
I've done this using Ricotta cheese (Chef Kevin's original recipe called for Ricotta, but in another instance, he used goat cheese). You might be able to use half and half, but I bet it will taste a bit flat. I think you could also go with only egg yolks too. Depending on what other stuff is in the tart, picking a different kind of cheese and/or using another kind of herb might be a good idea - Oregano was a bit strong when I tried it, but thyme works ok.
Baking
I trimmed off the excess crust, so the tart matched the pan. It's easiest to do this when the crust has cooled a little bit, but is still a bit warm. This is your chance to taste the crust by itself so you can figure out if you made an egregious error like leaving the salt out.

I started by laying in a base of caramelized onions. There's 3 medium onions here, making a layer about 1/8" thick in the bottom. The original recipe did not call for doing this, but I started doing it when making breakfast tarts (onion in the bottom, then ham or sausage and custard, then vegetables on the top). It took me a good 45 minutes to caramelize the onions - recipes are notorious for saying stuff like "Caramelize onions - after 10 minutes when onions are a mahogany color" - nope, not in 10 minutes. It takes 45 minutes and trying to do it faster just burns the onions.


After that, I arranged the asparagus spears in a radial pattern, poured the custard mix in, then put a half roasted cherry tomato and a couple coiled up ribbons in each segment. If you're using a rectangular pan (which totally inappropriate for pi day, but what I normally make my tarts in), you can use a repeating pattern. I've done it where I lay the asparagus spears over the whole tart the short way, or do some sort of pattern with slices of bell pepper. Chef Kevin's original recipe had ribbons of squash (1/8" thick, substantially thicker than mine here) inserted into the custard, sticking up.

The recipe calls for baking 20-25 minutes at 375, but I've found that's almost never enough. I typically wind up baking for another 10-15 minutes in 5 minute increments.
 I test the custard temperature with a fast reading thermometer - 180F seems to be nicely done and set. 160F is still a bit soft. I got a Thermoworks ThermoPop a while ago and it's really nice.
Toasting the Pine Nuts
I made this crust once without toasting the nuts. It sort of worked - the nuts do cook when the crust is baked and again when the tart is baked, but the consistency was weird. Toasting pine nuts is tricky - they go from totally untoasted to burnt pretty quickly so this is something you can't multi task on. I just put the pine nuts in a saute pan, heat it up, continuously moving them around until they nicely browned - smell is probably your best clue when it's about done. Another oddity is that as the nuts heat up, their oil softens and they get sticky, so keeping them moving in the pan requires more active work. Here's your chance to work on that "flipping the saute pan and keep the food in the pan" thing.


No comments:
Post a Comment