Friday, March 15, 2019

Vegetable Tart


This is a vegetable tart made for Pi Day (3/14) - it's based on a recipe from Kevin Isaacson (exec chef at the Caltech Athenaeum) which in turn is basically a standard short crust and custard.

The Vegetables

I used asparagus, cherry tomatoes (cut in half) and ribbons of yellow squash and zucchini. One thing to be aware of when making these tarts is that vegetables that have a lot of water (zucchini and tomatoes, for instance) can exude all that water during baking and affect the texture.  So what I did this time was roast the tomatoes in a 375 oven for about 10-15 minutes before using them. Put the tomatoes on the pan, use a liberal amount of oil, a sprinkle of salt, and roast away.


The ribbons could be done with a mandoline, but I just used a vegetable peeler.  After letting them sit for a bit, I blotted them dry using paper towels and rolled them into rosettes. The crust has toasted pine nuts and grated parmesan cheese in it, so I toasted the nuts and chopped them up before starting the crust.  There's a discussion on toasting pine nuts at the end.


The crust

The crust is where a pie or tart starts.  The recipe, by mass, is 3:2:1 of flour, cold butter, and ice water. The flour (2 cups of AP flour unsifted) with 1/2 tsp of salt is mixed with chunks of butter (6 oz), run with the mixer until "size of walnuts" - basically you want chunks still, not to the "coarse cornmeal" stage you might use for scones. Then you add the ice water and mix minimally until the dough "comes together".    Once you're at this stage, you add in some interesting flavors: in this case, toasted pine nuts that have been chopped up, and some grated parmesan, about 1/4 cup of each, but it's not super critical. Roll it and fold it  and roll it a couple times, wrap it in plastic and put it in the refrigerator to chill. You want the butter to be fairly hard, and the rolling and folding makes the butter into flat pieces in the crust.

Flour in the mixing bowl.  There's about 1/2 tsp of salt in the 2 cups of flour, and it's something you don't want to omit. sI did this once by mistake and it creates a peculiarly bland pastry that tastes very odd.  Fortunately, I caught it when I was tasting the crust trimmings after blind baking the shell, so I salted the crust before filling it.  The crust was still a bit weird, but it rescued the tart after all.


I've tried the freeze butter and grate it approach, but the cubes seem to work better, and it's faster anyway. You run it in the mixer until the cubes are fairly broken up. The recipe says "size of walnuts" which doesn't tell you "in the shell, shelled, or chopped". Other recipes say "pea sized".  In any case, you want distinct lumps of butter still, not the "coarse cornmeal" texture you might use for scones.  Older recipes say "rub in the butter" and that actually works pretty well if you're doing it by hand.  You squish the butter morsels between thumb and fingers covering them in flour, so you wind up with little flakes of butter.  This works better in a freezing cold kitchen in England than in a warm kitchen in southern California. The whole goal here is "cold butter chunks which will be squashed flat by the rolling" and warm hands in a warm kitchen gets you to the wrong place.


After you've mixed in the ice water, this is what it looks like.  The warning is to not over mix - just until it sticks together. Too much water, and you wind up with oily pizza dough and the temptation to over-roll and work it.

I mixed in the toasted pine nuts and grated parmesan cheese.  Then I did a few "roll it to about 1/2" thick, fold it over, roll it again" cycles.  This is truly one of the things where it took doing it a few times to get the right feel and butter lump size. Your first batch will be ok, and casual observers will be hungry and not picky about the texture, but after a few tries, it comes out much more consistent.

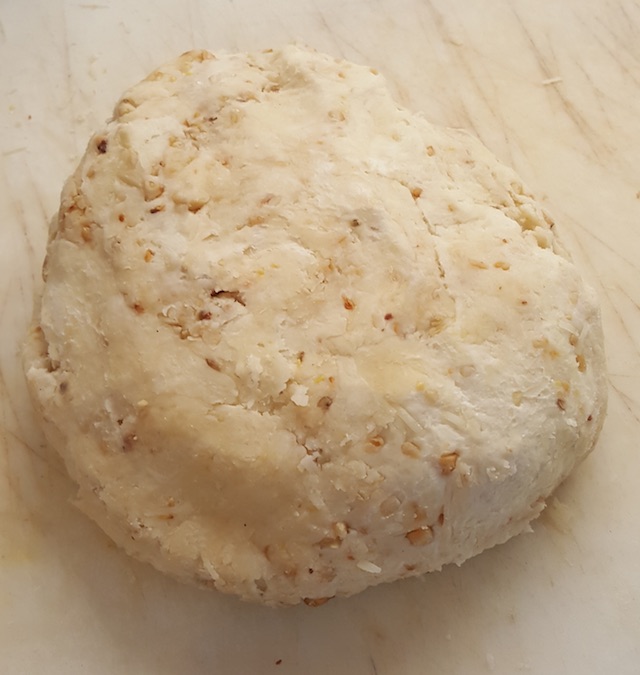
And here's the lump of crust, ready for chilling. Smash it out flat until it's about an inch thick, wrap it in plastic, and put it in the refrigerator. Chilling is essential. By the time it's had the nuts worked in, it's getting pretty warm and soft.  Play-doh consistency is too soft. You want it to be like a rock when you roll it out for the crust where you really have to lean into it when rolling.
Preparing the tart shell

The next step is to roll the crust thin, make the shell in the pan and blind bake it.  It will then cool  before filling and the final bake. I've left out the cooling step, and it sort of works, but the crust gets wetter. I've even baked a tart without doing the blind bake step - that was distinctly a soggy bottom scenario, and it actually leaked (I didn't do a good job sealing the gaps when putting the crust in the pan).

I rolled the dough out to 1/8" thickness and made sure it's going to fit. You'll see people using a ruler to measure their pan and then measure the dough.  Sure, you can do that, but I just put the pan on the rolled out dough and see if it will fit.  In this picture, the dough needs a bit more rolling out. When I've made it in the 4x10" rectangular pan, you wind up with a lot of extra dough. You probably only need half the amount as you do for the 10" round pan here.

I carefully draped it over the pan, and pushed it into the corners. Tart pans have fluted edges, and I pressed the dough into the flutes, so that you get that pretty outer crust.  I think also that the flutes are important from a baking consistency case - they brown up nicely and are a bit crispy. The dough should be fairly fragile (if you've over worked it so that it's like pizza dough, it will wind up tough), and tears and rips happen.  It's easy, you wet your finger, wipe it on the edges of the tear, and stick it back together.

 
In the picture above, I've trimmed it so about 1/2" sticks out past the edge.  I have trimmed to the edge before, but I found that the crust shrinks back a bit when baking, and you lose some edge height.  The final step is to "dock" it - poke it with a fork and put lots of little holes in the bottom.  This lets some of the steam out during baking so the bottom doesn't puff up too much.


Lay in parchment paper, fill it with beans, and bake it for 15 minutes.  After 15 minutes, pull the paper and beans out, then bake it again for another 5-10 minutes until the top of the crust just starts to brown.   Then you put it aside and let it cool.  There is nothing special about the beans - I'm sure you can go to a fancy store and buy artisanally hand-crafted pie baking weights, carved from the finest Carrarra marble. The whole idea is to provide something so that while the crust is baking, and that butter gets real soft, that the crust holds its shape. 


So here's a secret - really shove the beans up against the sides - it's the sides that want to collapse.  The crust in the bottom is laying flat, it's on a double layer of pan, so it doesn't get as hot. The other thing is to trim the parchment paper fairly close - if you've got a big piece of paper hanging over the edge, the crust doesn't bake as fast.  In most ovens, a good fraction of the cooking is done by radiant heat from the oven sides, not conduction from the hot air. The bottom of the crust is cooked entirely by conduction from the pans and through the beans on top.

While it's cooling, that's when you make the custard mix and prep all the vegetables.


Custard Mix

The custard is pretty standard and I've made it using all sorts of variations. 

  • 2 eggs
  • 1 cup of heavy cream
  • 8 oz of goat cheese (I found out that goat cheese comes in logs of various sizes that all look about the same, I've seen 6, 8, and 10 ounce sizes - frankly, for this recipe, it makes no difference)
  • 1/2 cup of grated cheese (Parmesan or Gruyere - I used a mixture, since I didn't have enough Gruyere to make a 1/2 cup)
  • a few tablespoons of Basil as a chiffonade - I grab a bunch of leaves, stack them up, roll it, and slice thin. Don't do this part ahead of time - Basil turns gross and black almost instantly when you cut it. 
  • Salt and Pepper

I've done this using Ricotta cheese (Chef Kevin's original recipe called for Ricotta, but in another instance, he used goat cheese). You might be able to use half and half, but I bet it will taste a bit flat. I think you could also go with only egg yolks too. Depending on what other stuff is in the tart, picking a different kind of cheese and/or using another kind of herb  might be a good idea - Oregano was a bit strong when I tried it, but thyme works ok.

Baking

I trimmed off the excess crust, so the tart matched the pan. It's easiest to do this when the crust has cooled a little bit, but is still a bit warm. This is your chance to taste the crust by itself so you can figure out if you made an egregious error like leaving the salt out.


I started by laying in a base of caramelized onions.  There's 3 medium onions here, making a layer about 1/8" thick in the bottom. The original recipe did not call for doing this, but I started doing it when making breakfast tarts (onion in the bottom, then ham or sausage and custard, then vegetables on the top). It took me a good 45 minutes to caramelize the onions - recipes are notorious for saying stuff like "Caramelize onions - after 10 minutes when onions are a mahogany color" - nope, not in 10 minutes.  It takes 45 minutes and trying to do it faster just burns the onions.

 
After that, I arranged the asparagus spears in a radial pattern, poured the custard mix in, then put a half roasted cherry tomato and a couple coiled up ribbons in each segment. If you're using a rectangular pan (which totally inappropriate for pi day, but what I normally make my tarts in), you can use a repeating pattern.  I've done it where I lay the asparagus spears over the whole tart the short way, or do some sort of pattern with slices of bell pepper. Chef Kevin's original recipe had ribbons of squash (1/8" thick, substantially thicker than mine here) inserted into the custard, sticking up.


The recipe calls for baking 20-25 minutes at 375, but I've found that's almost never enough. I typically wind up baking for another 10-15 minutes in 5 minute increments.

I test the custard temperature with a fast reading thermometer - 180F seems to be nicely done and set. 160F is still a bit soft.  I got a Thermoworks ThermoPop a while ago and it's really nice.


Toasting the Pine Nuts

I made this crust once without toasting the nuts. It sort of worked - the nuts do cook when the crust is baked and again when the tart is baked, but the consistency was weird. Toasting pine nuts is tricky - they go from totally untoasted to burnt pretty quickly so this is something you can't multi task on.  I just put the pine nuts in a saute pan, heat it up, continuously moving them around until they nicely browned - smell is probably your best clue when it's about done. Another oddity is that as the nuts heat up, their oil softens and they get sticky, so keeping them moving in the pan requires more active work. Here's your chance to work on that "flipping the saute pan and keep the food in the pan" thing.


Saturday, March 9, 2019

Making Beef Stock

Stock is one of those generally useful things for cooking - it's used as a base for soup and sauces, you can use it to cook things in, etc.  This post is about making rich brown beef stock using roasted bones and mirepoix (onions, carrots, celery).  The process is pretty simple, albeit time consuming - you start by roasting the bones and the vegetables, then put them in a pot with water, heat the water up to a slow simmer, and let it sit and extract all the goodness.  After a while (a day), you strain everything out, add a new batch of mirepoix to the bones, add more water, and do a second extraction (called remoulage in culinary terms).

I started by getting bones at the supermarket. At Gelson's they charge $1.50 a pound for beef knuckles, which are actually more like the ends of the femur or humerus. The middle of those long bones gets sold for a lot more as marrow bones.   If you ask, the butcher will saw the knuckles up into chunks, which is good - you want to expose the marrow in the interior of the bone, since that's one of the primary sources of flavor.

 The traditional vegetables for making stock are onions, celery, and carrots in a roughly 2:1:1 ratio, although it's hardly critical. For this particular batch, I had a bunch of mushrooms getting slimy in the refrigerator, so I cut those up and added them to the roasting pan.  This is also when I go rummaging for scraps of meat from trimming a roast or other piece of meat to size.  If you have that chunk of frozen hamburger meat you forgot about and is all freezer burned and ugly, this is the time to use it.

I shoved the pan in the oven at 375-400 degrees for a few hours until it was nice and brown.  A couple times during the roasting process, I turned the bones and vegetables over.  I've also put the bones on a half sheet pan in a single layer, and that works a bit better - the roasting pan holds more of the moisture in, and you actually want the stuff to lose some of the water, and cook in the rendered out fat.

Roasting is the key to flavor - it's that Maillard reaction converting proteins and starches into sugar.  Roasting also helps render out some of the fat.  I guess, in theory, one could save the fat for cooking something, but it has a pretty strong flavor when you're doing beef (when you make chicken stock, the fat is much more pleasant flavored, and is called schmaltz in traditional German cooking).  If you're making french fries, beef fat is apparently what you want for optimum flavor - really high smoke point, good taste.  To be honest, though, I like frying potatoes in duck fat.

The next step is to prepare the stock pot - if you aren't roasting your vegetables separately, then it all goes in together.  If you're roasting separately, or not roasting the vegetables at all, throw them in the bottom. A handful of parsley, and all those bones on the top.  Cover it all with water - in theory, cold water and heating slowly is supposed to make the stock more clear, but I wind up filtering it anyway, so I've not worried about it.  You need a BIG pot - I use the pot from my pressure cooker - it's big, sturdy, and works ok.
 This is the pot being prepared for the second extraction, but it's the same general idea the first time. There's no special exotic skill required here.

Then turn on the heat and wait, and wait, and wait.  It will warm up, and you'll start to see scum form on the surface as well as fat accumulating.  Skim those off periodically with a ladle.  The scum is from denatured proteins and it also traps other particulates. You don't want a rolling boil, just a gentle simmer.  What I do is put the pot to one side of the burner. The hot side of the pot makes the liquid rise to the surface, it flows across the top of the pot, and descends on the cool side, so there's a steady circulation.   Periodically, I add more water, skim more crud, skim more fat.  You can set it up so there's a sort of steady state, and leave it overnight.

Finally, you've run out of patience. I strain all the (thoroughly soggy) vegetables and bones using a chinois  ( a conical strainer) into a big plastic container (mine's a standard Cambro).  This always seems to be a messy process, whether you're ladling the liquid into the strainer, scooping the solids, or pouring the whole thing out.  Ultimately, though, the big pot is empty, the liquid is in the Cambro, and you have a pile of cooked bones and vegetables.

I pick out the more obvious vegetables, then load the stock pot again, with fresh mirepoix vegetables: Get the pot hot, add some oil, dump in the chopped vegetables and soften them up a bit, maybe just as they start to caramelize, dump all those bones in, add water, and repeat.  This second extraction pulls more of the gelatin and flavor out, but generally isn't as dark or flavorful as the first extraction.

Meanwhile, the liquid from the first extraction can be cooled down and you get another chance to skim the fat.  The picture is showing the fat layer on the remoulage (second extraction), but it looks the same on the first go-around. I pour off the liquid, making sure not to disturb the particulate crud in the bottom of the container. 
 

 I then reduce the liquid a bit more - maybe by half? and then get ready to do the final filtering.
In theory, there are techniques using egg whites and such to remove the particulates, but I've found that filtering through plain white paper towels works pretty well.  For my next batch, I'm going to try some fancy new fabric filter bags made for this kind of use.


I ladle the reduced stock through the filter (in the same conical strainer) - you'll see plenty of particulates, and the flow through the filter gradually slows as it gets plugged up. Once that's done, I portion it out into plastic containers to go into the refrigerator or freezer.

The second extraction works the same way - strain it, reduce it, filter it. Here's a picture of the remoulage being portioned out and you can see how gelatinous it is at refrigerator temperatures.  That gelatin is what makes for a that wonderful unctuous mouth feel when you use a good stock.


Overall, from 10 pounds of bones, I wound up with about 2 liters of first extraction, and 1 liter of second extraction.

Braciole in tomato sauce, with gnocchi sorrentino.

Braciole are little rolled up bundles of beef with a filling, braised in a tomato sauce, served with gnocchi.  The recipe came from a cooking class by Kevin Isaacson, the executive chef at the Caltech Athenaeum.

You start with some fairly inexpensive meat - you're going to pound it out thin, which breaks down the toughness, and besides, it's going to cook for a couple hours. I started with top round roast, since I was looking for a piece of meat that could be sliced into uniform shaped slices about 3/8"-1/2" thick.  You don't want too tender a cut, because it will fall apart - this is not the dish to use up those spare filet mignon tournedos. Next time, I'll trim the pieces to be more uniform in outline.


There's also all the fillings: crushed garlic, parsley, pine nuts, raisins soaked in port, and the things you'll need to make the sauce: thyme, rosemary, sliced onions, tomatoes and wine. Note the glass to test the wine and make sure it's not gone bad.


You pound the meat out to less than half the original thickness - oil, a heavy duty plastic bag, and the hammer.  After it's thin, it's smeared with a crushed garlic and sprinkled with chopped parsley


Then, you lay a strip of prosciutto (or jamon serrano) over the meat. I suppose you could use thin sliced bacon. Finally, a filling of toasted pine-nuts and raisins, and you're ready to roll them up.

It's kind of like rolling a burrito, then tying it up with twine.


They're ready to brown in the heated pan with some oil.  Brown all the sides and ends, then pull them out and set them aside.
  

Add some more olive oil if needed, and caramelize those onions.  About 30 seconds before the onions are done, add thin garlic slices.  The usual "heat until fragrant but don't burn the garlic" and dump in the tomatoes, wine, and other ingredients. I added some sliced mushrooms, as well as all the herbs, and some more pine nuts and raisins.


This goes in the oven, covered with the rolled up beef and you cook it for a couple hours.  Extract the bracioles and blend the sauce.
 

Remove the twine, cut the braciole in half, put it on a plate with some freshly cooked gnocchi, sauce, and melted cheese. I added some glazed carrots as another vegetable.  Had I been thinking, I would have bought some green beans or asparagus if only for a color contrast. But you cook what you have in the refrigerator.


It's a bit time consuming, but fun, and there's a 2 hour pause in the middle while it braises.

Monday, June 25, 2018

DDS Spurs

A simple example for showing how spurs move around with a DDS.
In all cases, the DDS has a 16 bit phase accumulator and a 5 bit phase truncation.
The spectrogram x-axis shows frequency scaled by clock rate (i.e. 0 to 0.5, because the simulation is real only)
The y axis is the DDS set frequency, also scaled by clock rate.  The spectra were computed with a Hamming window, and a 4096 point transform.

First, for frequencies near zero

Then, for frequencies near fclock/15


Finally, for frequencies near fclock/4


You can see the "big spurs" move in nice lines, but the small spurs are essentially random (little speckles throughout the image)

Saturday, March 3, 2018

Adventures in Making Salami


After working toward this for a few years, I've finally started my first batch of Salami, the classic fermented sausage. I've got the cultures, I've got a place to hang it, I've improvised an incubator, we're ready to go.  I'm using the recipe from Ruhlman's Charcuterie.  The recipe starts with 4 lbs of pork shoulder and a pound of fat. The key aspect to salami is that there are distinct chunks of the fat in among the meat mix.

Preparing the mince

I've done the "get a pork shoulder and cut it up" a bunch of times, and this was no different: you go to the supermarket and ask for a whole boston butt (that's what it's called in California, the names of cuts vary around the country) with the fat cap on.  Typically, if you get the pretrimmed shoulder, it's had the fat removed, and you need that fat.  This particular butt was just about 11 pounds, of which I got about 1 1/2 pounds of fat, 8 1/2 pounds of meat, 1/2 pound of bone (very tiny!), and less than a 1/2 pound of scraps (usually that "soft fat" that doesn't grind well).  Soft fat is a sort of foamy, squishy fat that's found between muscles, often mixed with some connective tissue. Pork shoulder is a great meat - it's really cheap, it gets some exercise from the pig walking around, it has good flavor, and it's not too lean - even though modern commercial pork is "the other white meat" and generally too lean.

Trimmed Boston Butt
You start by trimming the fat cap off, it's about 1/2-3/4" thick - a sharp thin knife works well - since we want chunks in the salami, we really want the cap in a solid chunk.  If your butcher has it, you can just get back fat, which is even better - that's the thick layer of fat between the pig's muscles and the skin. The commercial boston butt has most of that trimmed off.

Fat Cap cut into strips
That's a half pound bone there.
Then it's just a matter of cutting the remainder into convenient sized chunks that can be fed into the grinder. In most shoulders there's a weird shaped bone you'll need to excavate - it's part of the pig's shoulder blade, and has curves and hollows in it, so a good boning knife helps to follow the bone and extract it. You're making sausage, you're going to grind the meat anyway, so pretty cutting isn't needed.
A nice hunk of shoulder, notice the marbling in the middle of the muscle.

Then slice it up - I use a butcher's cimeter (or scimitar)
to cut about 1" slices
And then cube it 


 8 pounds of cubed shoulder (with some scrap in the corner)
Shoulder Grinding
Fat Grinding
Now that we've got all our meat ready, we put it in the freezer.  Frozen (or almost frozen) grinds much better.  If the meat (or grinder) is too warm, the fat melts and smears which is bad for the texture. Normally, for most sausage, you grind the fat and meat together, but for salami, you want distinct chunks. I ground the fat through the coarse plate, but it still came out a bit fine - we'll see what it looks like when the sausage is done.  I think next time, I'll just cut the fat into little cubes by hand.


Mix and Stuff

The next step is to mix the seasoning, curing materials, and bacteria culture, then stuff it into the casings. The Ruhlman recipe is:
  • 4 lb of meat
  • 1 lb of fat
  • 2 ounces of Cure #2 (mixture of Salt, Sodium Nitrite, and Sodium Nitrate)
  • 30 grams of dextrose
  • 12 grams of ground pepper
  • 6 grams of garlic
  • 125 ml of red wine
  • 60 ml of water with half a packet of Bactoferm F-RM-52 culture
All fermented sausages rely on a combination of bacteria to convert the sugar (in this recipe, the dextrose) to acid and lower the pH.  The pathogens (bad bacteria) can't live in an acidic environment.  They also convert the nitrate into nitrite gradually. Non-fermented curing uses just sodium nitrite, typically included as "pink salt", which is NOT that Himalayan pink salt so popular these days. By the way, if you see sausage (or bacon) that advertises "uncured" or "no nitrites added", you'll usually see something like celery juice in the ingredients.  Well, celery juice has lots of nitrites in it.  The potential bad health effects from nitrites and nitrates are from having too much (and then cooking at high temperatures) - by using the commercial curing salt, we can accurately control the amount of nitrate and nitrite.

This particular recipe is a bit different from a traditional Italian recipe, mostly because of the use of of a fast acidification culture.  The RM-52, which is a mix of Staphylococcus carnosus and Lactobacillus sakei that grows well at relatively high temperature (80-90F, 30C) so it gets to the acid state really quick. It might be a bit sour tasting (we'll find out), but it minimizes the time when pathogens can grow (particularly Listeria). There are other cultures (F-LC) which specifically work against Listeria.

The stuffing process is straightforward.  I used the regular medium hog casings I use for other sausage. For a first try, a smaller diameter is better than the more traditional 2-3" size.  The challenge in salami making is having it dehydrate at the right rate, while the bacteria and nitrate/nitrates do their work.  If it dries fast, the outside will be dry, but the inside will be wet, and it will rot from the inside. If it dries too slow, you wind up with jerky.  My 5 pounds of mix filled about 10 feet of casings.

Ferment and age


Last time I did fermented sausage, I made Landjaeger, and it was summer, so the garage was warm enough to cure.  Now in deep mid-winter here in Southern California, the garage is 50-60F, so I improvised an incubator with a reptile heating pad/controller and an ice chest.  It kind of works, but I think I need a better container - it would be nice to have something with some racks to hang or lay the sausage on.  For the Landjaeger, you squash it between two boards (or jelly roll pans, in my case) to get that sort of flattened oval, and those would never fit in the ice chest.

After 2 days at 30C, the pH had dropped to about 4.9, which is far enough.  Then it's time to hang it in the curing closet, nominally at 50-60F and 50% RH.  My curing closet is an industrial shelving unit wrapped in insulating board, then standard fiberglass batts. A small airconditioner keeps the interior cool.  I've not needed to add a humidifier yet, but that's next.
After a week, it weighs about 4 lb
Freshly hung, about 4 3/4 lb.
Both the salami and the interior of the chamber were inoculated with  Penicillium nalgiovense in the form of MOLD-600 (inoculated is a fancy word for slathered using a paint brush).  This is the white mold that you see on most fermented sausages - it suppresses the growth of other nastier molds.  The whole fermentation business, whether making sauerkraut, salami, kimchee, beer, wine, etc. is all about having a good microbe keep bad microbes from growing.

How it turned out


Well, we don't know yet - check back in a couple weeks.